Haptic Feedback Evaluation Kit Tutorial: Changing Modes of Operation
Looking for our Haptics range? View our main Haptics hub here.
Introduction
No editing or code experience is required. These steps should show you how to easily change the modes of operation. A lot of the process is around the installation procedure, so subsequent changes are very simple.
There are three different modes of operation that are available with the Haptic Feedback Evaluation Kit:
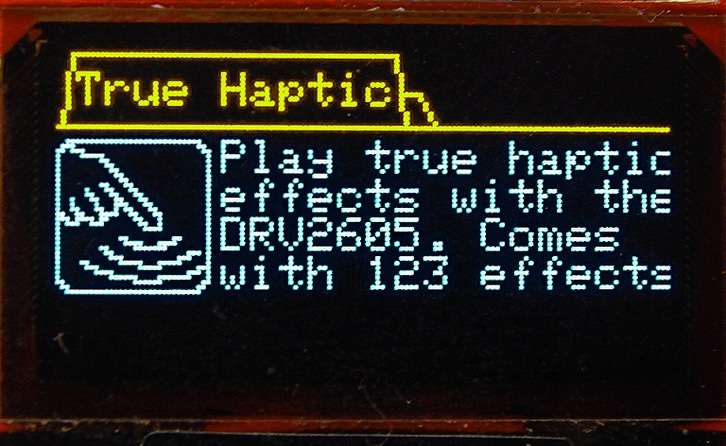
- Intro Mode – loaded prior to shipping, includes guides and tutorials to haptic feedback, vibration alerts, and the DRV2605 haptic driver
- Engineering Mode – gives advanced access to the DRV2605 effect library and allows users to build vibration alerts
- Development Mode – initialises communications buses and sets pins, but leaves the main loop open for development
Each of the modes is open and available to download online. You can switch between the different modes as many times as you like, and edit them to suit your own needs.
On the Arduino Uno R3, there is an Atmel processor which contains the current mode of operation. To change this you need to write the new code to the processor, which is much simpler than it sounds.
Arduino enables you to write code to the processor by using its programming environment, which is a program that runs on your Windows, Mac OS X or Linux operating system. This means to change the modes of operation you will need to install this software.
The code that is written to the Arduino is contained in a group of files, the main file is called an ‘Arduino sketch’ (or often just ‘sketch’, these have the file extension .ino). Each mode of operation has a different sketch. There are also other files required to support the functions in the sketch.
As each sketch is written for you, once you have downloaded the files and installed the software you can open the desired sketch and upload the new mode of operation with one click. No editing or code experience is required (with the exception of Development Mode, but that is the idea behind it!).
The Steps
1. Install the Arduino drivers (Uno) and software
It is recommended to install the Arduino drivers even if you only intend to use the Intro Mode. Installing the drivers allows the Haptic Feedback Evaluation Kit to draw more power from the USB port for improved performance.
Installing the drivers and software is straightforward, however, the process is updated from time to time. We, therefore, recommend you follow the instructions on the Arduino website.
The Haptic Feedback Evaluation Kit is built on an Arduino Uno R3, you will be following the instructions for the Arduino Uno. Select your operating system and follow the steps here:
http://arduino.cc/en/Guide/HomePage
2. Download the mode of operation files
Each mode of operation has its own sketch and all of the required files available for download on this page:
Modes of Operation
Download the required zip file and extract it to your desired location on your computer. We recommend extracting the files to a folder that has the same name as the zip file and Arduino sketch (the reason is in the next step!).
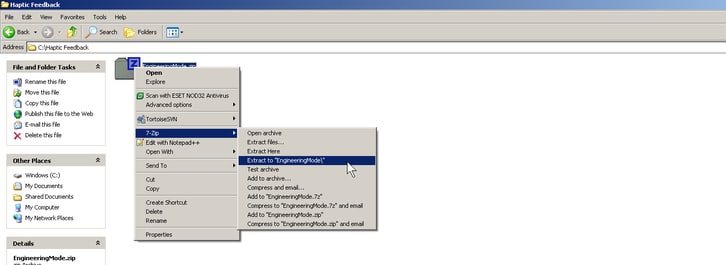
3. Open and Upload
Arduino sketches need to be located in a folder of the same name. If you open the Arduino sketch when it is not located in a folder of the same name, the Arduino environment will show an error asking you if you wish to move the file.
If it does, select yes (otherwise it just closes!) and make sure all the libraries and header files have also been moved to the new folder. If you have to move the files manually restart the Arduino environment!
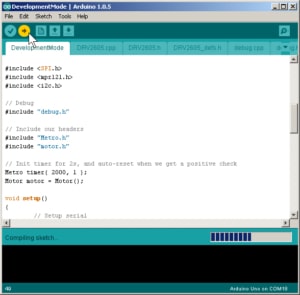
Once you have opened the sketch, you can click the upload button in the top left to write the code to the Arduino.
You should now see the new mode of operation on the OLED screen! Have you read the user manual section for the mode you are using?
I Get Errors!
Don’t panic! This is common in software development, it does not mean anything is necessarily broken and most can be easily fixed. The most common culprits are:
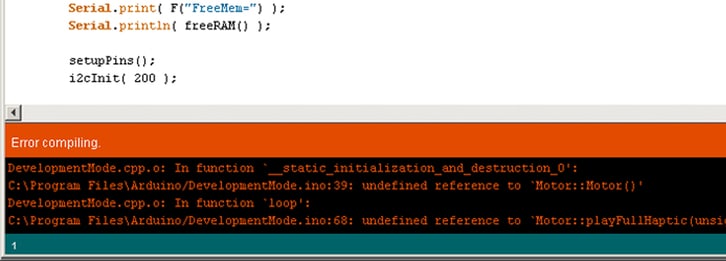
Undefined reference to ‘something::somethingelse()’
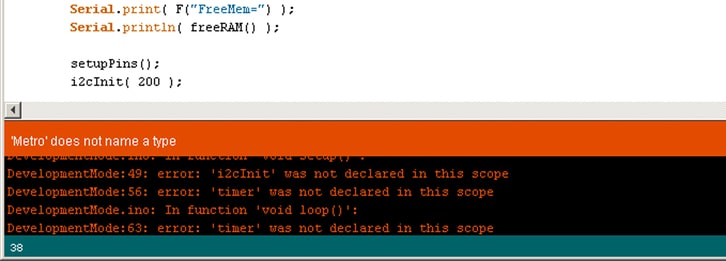
Normally a missing *.cpp file, the name is the word preceding the double colon::. In this case, we would be looking for a file called something.cpp.
The file should be in the same folder as the Arduino sketch and accompanied by the header file of the same name (something.h). Find the missing file(s) and move it to the folder with the sketch. Close and restart the Arduino environment.
‘thisvariable’ was not declared in this scope
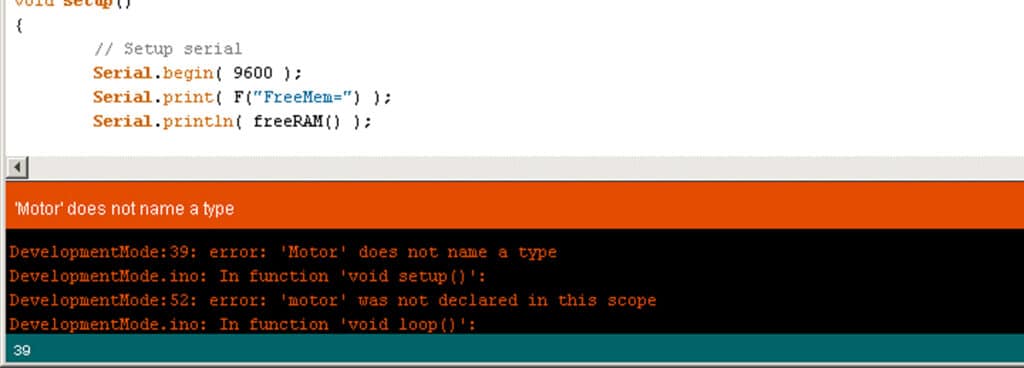
Normally a missing *.h file, scroll to the first error in the Arduino environment which should specify exactly which file is missing.
The file should be in the same folder as the Arduino sketch and may be accompanied by a *.cpp file of the same name (something.cpp). Find the missing file(s) and move it to the folder with the sketch. Close and restart the Arduino environment.
‘sbi’ was not declared in this scope
Normally missing libraries. This is often due to the Arduino environment not being correctly configured, specifically the “Sketchbook location” is pointing to a folder that does not contain the required libraries.
Click File > Preferences in the Arduino environment. The first option is the Sketchbook location, which is where the environment expects to find a folder called ‘Libraries’ with the required libraries in it.
To solve this you can either:
- Point the ‘Sketchbook location’ to the folder where you extracted the mode of operation zip (easiest)
- Point the ‘Sketchbook location’ to the folder where you keep all libraries, such as “\My Documents\Arduino” and copy the files in the downloaded mode of operation ‘Libraries’ folder to the Arduino environment ‘Libraries’ folder (recommended, see Manual Installation here)
Close and restart the Arduino environment.
Other Errors
If you are experiencing other errors in the Intro Mode or Engineering Mode please contact us. Any information you can provide about your system and the errors you have experienced will be extremely useful!
This is a useful link on how to submit good bug reports. You can email [email protected] to get in touch.

Get in touch
Speak to a member of our team.
Motor catalogue
Looking for our products?
Reliable, cost-effective miniature mechanisms and motors that meet your application demands.
Newsletter
Sign up to receive new blogs, case studies and resources – directly to your inbox.

Sign up
Discover more
Resources and guides
Discover our product application notes, design guides, news and case studies.
Case studies
Explore our collection of case studies, examples of our products in a range of applications.
Precision Microdrives
Whether you need a motor component, or a fully validated and tested complex mechanism – we’re here to help. Find out more about our company.